Are you interested in learning how to record your stand up comedy sets properly?
Tired of putting grainy or blurry or low quality cell phone clips on Instagram only to get the same three or four comments from your open mic buddies?
Do you recognize the need to invest in your career and have proper production quality gear on the go so you can get more eyeballs on your sets and start making some money?
Well if that sounds like you…you’re in the right place.
In This Guide:
- The Reality: You’ll Mess Up Your First 10 Recordings
- Before You Film: Pre-Production Planning
- Camera Placement and Framing
- Lighting: Working With What You’ve Got
- Audio Capture: The Step-by-Step
- The Day-Of Setup Workflow
- Filming Solo: The One-Person Crew Guide
- During the Show: What to Watch For
- Everything That Will Go Wrong (And How to Fix It)
- Post-Production: From Raw Footage to Finished Clip
- Your First Clip vs. Your Special: Different Workflows
- Release Strategy: Where and When to Post
- Conclusion
- FAQ
The Reality: You’ll Mess Up Your First 10 Recordings. Do It Anyway.
I’m going to save you a year of frustration with one sentence: you will record about 10 shows before you get a usable clip.
Something will go wrong every single time. The audio will clip. Someone will stand in front of your camera. Your SD card will fill up during your best bit. The spotlight will turn your face into a white blob. Your battery will die at minute 46 of a 50-minute set, right before your closer joke, which today is the best response you’ve ever gotten.
I’ve been through all of it. I put this guide together so you can figure out recording your shows by 10 attempts instead of 100.
This is not a guide about what camera to buy since I wrote that one separately, and you can read the full best cameras for stand-up comedy buying guide here. This guide assumes you already have some gear (or a phone) and you want to know the process like how to actually plan, set up, shoot, edit, and release a comedy clip that doesn’t look like it was filmed on a security camera.
Stand-up comedy isn’t impossible to film, or particularly difficult…if you have a crew. And of course, you have a crew for every open mic with 5 people, right?
Ok, so that’s where it gets difficult.
Unless you have a team of people constantly helping who are checking levels, angles, lighting, aperture, and focus then live shoots, even in a small bar, can be quite hectic. Most of us are doing this alone, and that changes everything about how you approach it.
Who this guide is for: Comedians who have some recording gear (even just a phone) and want a step-by-step process for actually filming their sets and turning them into clips people will watch. Whether you’re recording your first open mic or planning a full special, this is the workflow.
Last updated: February 2026.
Before You Film: Pre-Production Planning
The difference between a good recording and a wasted night usually comes down to what you did before the show started. Here’s everything you need to think about before you hit record.
Choose Your Venue Carefully
Not every room films well. Before you commit to recording at a specific venue, think about these things:
Permission. This is first for a reason. Some clubs don’t allow filming period. Other audiences may not want a doctor from the local hospital seen laughing at your dirty joke and then on Instagram.
Lighting. Visit the venue during a show (not during the day) and look at the stage lighting. Is there a spotlight on the performer? Is it too bright? Too dim? Are there colored lights that change during the show? Consistent, warm stage lighting is ideal. Rooms with LED party lights that cycle through colors are a nightmare to film in.
Background. What’s behind the performer on stage? A brick wall looks great on camera. A cluttered storage area with exit signs and bathroom doors does not. You can’t always control this, but when you have a choice, pick the room that looks better on camera. When in doubt a black background is ideal.
Sound setup. Does the venue have a PA system with a soundboard? Can you get an audio output from it? If yes, your life just got dramatically easier. If no, you’ll need a backup plan (more on this in the audio section). If you can, talk to the venue’s sound person before show night, introduce yourself, explain what you’re doing, and ask if they can give you a line out from the board. Most sound techs are happy to help if you ask nicely and don’t get in their way.
Space for equipment. Where can you set up a tripod without blocking the audience? Is there a back table you can use? Is there room for a second camera off to the side? Some rooms are so tight that a tripod in the audience area will get bumped by every person walking to the bathroom.
Plan Your Shoot
Before show night, decide:
How many cameras? For weekly clips and social media, one camera is enough. For a showcase set or EPK material, two cameras make a massive difference. For a special, you want three minimum. (For specific camera and lens recommendations, see our camera buying guide.)
Solo or crew? If you’re doing this alone, you need a different approach than if you have one or two friends helping. I’ll cover the solo workflow in detail below.
What are you recording for? A 60-second Instagram clip requires a different setup than a 45-minute set for your YouTube channel. Know your goal before you set up, because it affects everything from camera placement to how you edit later. Also remember your clip will go vertical on Instagram so you need space to the right and left of the person to edit properly.
Audience: Social proof is very important in Instagram and Tik Tok reels. As a result, you probably want some basic camera on the audience in case you have some good moments with them. Typical workflow is real camera on performer and wide angle on audience that you can use for grainy reaction shots on zoomed in vertical Instagram edits if needed.
Make a Gear Checklist
Here’s what you should pack for every recording night. I keep this list on my phone and check it before I leave the house:
Essential (every shoot):
- Camera (charged battery + one spare)
- Lens
- SD card(s) — formatted and empty, with enough space for the full set
- Tripod
- External microphone or audio recorder
- Phone (backup camera + backup audio)
- Headphones (to monitor audio during sound check)
Nice to have:
- Second camera + tripod
- XLR cable (to connect to soundboard)
- Extension cord / power strip
- Gaffer tape (for taping down cables so nobody trips)
- Small LED light (in case the stage lighting is terrible)
- Lapel mic if you want your audio super clean and will mix with audience mic later or phone audio.
The most common reason for a ruined recording isn’t bad technique. It’s showing up with a dead battery, a full SD card, or forgetting your tripod. The checklist prevents this. But you can also have everything right and then a crowded show has a tall guy in front of your camera the whole time.
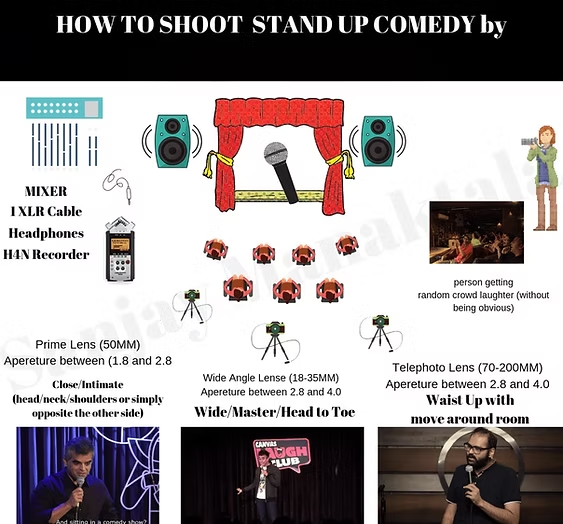
Camera Placement and Framing
Where you put the camera matters as much as what camera you use. Here’s what works.
The Single Camera Setup
Place your camera at the back of the venue, center of the room, at approximately neck to chin height of the performer on stage. Not eye level from where you’re standing but chest to chin height of the person on stage, which usually means your tripod is at about 4.5 to 5 feet high if the stage is raised.
Frame a medium shot: the performer from roughly the waist up, with some stage context visible on either side. Leave headroom and don’t put the comedian’s head at the very top of the frame. About 10-15% space above their head is the sweet spot. This makes editing. so much easier.
If you’re shooting in 4K (and you should be), you have room to crop in post. So frame a little wider than your final output as this gives you the flexibility to punch in for a tight close-up or crop to vertical for Instagram without losing quality. But remember 4K can eat your storage and battery faster and sometimes have your camera overheat and stop recording mid set.
The Two Camera Setup
Camera A (wide/safety shot): Back of the room, centered. Wider lens. This camera captures the full stage plus some audience. It runs the entire set without anyone touching it. This is your “safety” — if Camera B fails, you still have a usable recording.
Camera B (close-up/main): Closer to the stage and slightly off-center (not dead center — offset to one side by about 15 degrees). Longer lens, framed tight on the comedian’s face and upper body. This is the shot that makes your edit look professional. If you only have one person helping, this is the camera they should monitor.
In editing, you cut between the two. Wide shot for the setup of a joke, cut to the close-up for the punchline and reaction. This is exactly what Dry Bar Comedy and Kill Tony do, and it’s a huge part of why their videos look so polished.
Common Placement Mistakes
Camera too low. If your camera is on a table at waist height, you’re shooting up the comedian’s nostrils. Nobody looks good from below in harsh stage lighting. Get the camera up to their chest/chin height.
Camera too far to one side. Extreme side angles look weird for stand-up because the comedian is mostly facing forward. Slight offset is fine; 45 degrees off-center is not.
Camera in the aisle. If your tripod is in a walkway where audience members pass to get drinks or use the bathroom, someone will bump it. Guaranteed. Gaffer tape the tripod legs to the floor if you have to, or find a spot against a wall.
Shooting through heads. If audience members’ heads are visible in your frame, that’s actually fine for a wide establishing shot as it gives the sense of a packed room. But your main/close-up camera should have a clear line of sight to the stage with no obstructions.
Lighting: Working With What You’ve Got
Let me be honest: in most comedy clubs and bar shows, you have zero control over the lighting. You’re not going to show up to an open mic and start setting up studio lights. The bartender is already annoyed you brought a tripod.
So the skill is working with what the room gives you.
The Spotlight Problem
This is the number one technical challenge in comedy club footage. There’s a bright spotlight on the performer and everything else is pitch black. Your camera doesn’t know what to do it either blows out the comedian’s face into a white blob, or it tries to brighten the dark room and everything gets grainy.
The fix: Switch your camera to spot metering mode and meter for the comedian’s face. This tells the camera to expose for the bright area (the performer) and ignore the dark background. Yes, the audience will be dark. That’s fine. Nobody needs to see the walls. You want the comedian properly exposed.
If the face is still too bright after spot metering, use exposure compensation to dial it down by -0.5 to -1.0 stops. You can recover dark shadows in editing much easier than you can recover a blown-out white face.
Pro tip: If you shoot in a log color profile (S-Log3 on Sony, C-Log on Canon), you capture more highlight detail, which gives you more room to fix exposure issues in post. But only do this if you plan to color grade — log footage looks flat and gray straight out of the camera.
When You Can Add Lights
If you’re producing your own show at a bar or restaurant which means you booked the room, you’re the producer, and you control the environment then you can often add a couple of small LED panels to improve the stage lighting. A single LED panel at about 3200K (warm) positioned above and slightly in front of the stage can make a huge difference without blinding the performer.
But don’t do this at someone else’s show without permission. And even at your own show, keep it subtle. The audience came to see comedy, not to sit under studio lights. Don’t Tell Comedy is great at having a lighting rig at their recordings and you can tell from their clips, although it can be invasive to a live audience crowd.
Audio Capture: The Step-by-Step
I cannot overstate this: stand-up comedy is 90% audio, 10% video. You can watch a slightly out-of-focus comedy clip and still laugh. You cannot watch a clip with bad audio. If the audience can’t hear the jokes or can’t hear the room laughing, the clip is dead.
NEVER record a stand-up comedy show using camera audio only.
The built-in microphone on your camera is garbage for stand-up. It picks up every cough, every glass clinking, every drunk person whispering to their friend and the comedian sounds like they’re performing in a bathroom. For detailed audio gear recommendations, check our audio section in the camera guide.
Here’s the step-by-step workflow:
Step 1: Get the Board Feed (If Available)
The comedian is speaking into a microphone that goes into a mixer/soundboard. That soundboard has an output. You want a cable from that output into your recording device. This gives you the comedian’s voice, clean and clear, with minimal room noise.
How to do it: Before the show, find the sound person. Introduce yourself. Ask: “Can I get an XLR output from the board for my recorder?” Most will say yes. Run the cable from the board into a portable recorder like a Zoom H5 or Tascam DR-40X. Set your recording levels during the sound check because you want the meters hitting about -12dB to -6dB on normal speech, with room for loud laughs and applause to peak without clipping.
What if the sound person says no? It happens. Some venues don’t want you touching their gear. Don’t argue as you need them on your side. Fall back to a lavalier mic or a recorder placed near the stage.
Step 2: Capture the Audience
The board feed gives you the comedian’s voice but stand-up without audible laughter is just a person talking. You need a separate microphone capturing the audience reaction.
A shotgun mic mounted on your camera or a small stand pointed toward the audience works well. Position it so it picks up laughs and reactions without picking up individual conversations. If you’re using a Zoom recorder in 4-channel mode, you can use the built-in mics for audience and the XLR inputs for the board feed all in one device.
Step 3: Phone as Backup Audio
Here’s a trick that has saved me multiple times: prop your phone on the edge of the stage or on a stool near the PA speaker, open the voice recorder app, and hit record. This is your emergency backup. If your main audio fails meaning the board feed clips, the recorder dies, the cable gets unplugged then you at least have phone audio that you can sync with the video in post.
Phone audio isn’t great. But phone audio synced with good video is infinitely better than great video with no usable audio.
Step 4: Sound Check
If the venue does a sound check before the show, be there for it. Run a test recording for 30 seconds while someone talks into the mic at performance volume. Put on headphones and listen back immediately. Check:
- Is the comedian’s voice clear and not distorted?
- Are the levels peaking into the red on big laughs? (Turn the gain down.)
- Is there a weird hum or hiss? (Usually a loose cable or electrical interference — move your recorder away from power cables.)
- Can you hear audience/room sound on your second mic?
Fix audio problems before the show starts. You cannot fix clipped or missing audio in post-production. That footage is gone.
The Day-Of Setup Workflow
Here’s the step-by-step for show night. I do this in this exact order every time.
60-90 Minutes Before the Show
- Arrive early. Before the audience is there. You need time to set up without people walking through your shot.
- Walk the room. Look at the stage from different angles. Decide where your camera(s) will go. Check for potential obstructions — a pole, a speaker, a waitress station.
- Set up tripod(s) and camera(s). Get them at the right height and angle. Frame your shot. Lock the tripod head.
- Run audio cables. Get the board feed connected. Set up your audience mic. Tape cables to the floor with gaffer tape so nobody trips.
30-45 Minutes Before
- Sound check. Record a 30-second test. Listen on headphones. Adjust levels.
- Test shots. Record a few seconds of video with someone standing on stage (or stand there yourself). Check exposure. Check focus. Check framing. Make adjustments.
- White balance. Set it manually now while the stage lights are on and stable.
- Format your SD card (if you haven’t already) so you have maximum recording time.
10 Minutes Before
- Hit record on all devices. Start your camera, start your audio recorder, start your phone backup. I start recording about 5-10 minutes before the first performer goes up. Storage is cheap. Missing the first 30 seconds of a set because you forgot to hit record is not.
- The 5-minute checklist:
| Check | Status |
|---|---|
| Camera recording? (red light/icon visible) | ☐ |
| Audio recorder recording? | ☐ |
| Phone backup recording? | ☐ |
| Focus set correctly? | ☐ |
| Audio levels not clipping? | ☐ |
| Enough battery for full set? | ☐ |
| Enough SD card space? | ☐ |
| Tripod secure and not in walkway? | ☐ |
Then sit back, watch the show, and try not to stress. If you did the setup correctly, everything should run on autopilot.
Filming Solo: The One-Person Crew Guide
Most comedians don’t have a crew. You’re setting this up yourself, probably in a corner of a bar where nobody is helping you. Here’s how to make that work.
The Set-It-And-Forget-It Approach
When you’re filming alone, you cannot adjust anything once the show starts. You won’t be standing behind the camera tweaking focus during your own set. So the strategy is: get everything perfect before the show starts, then don’t touch it.
Autofocus is your friend. Set your camera to continuous face-tracking autofocus. Modern cameras (anything from the last 3-4 years) are remarkably good at locking onto a face and keeping it sharp even as the performer moves around the stage. Don’t try to manual focus in a dark room from 30 feet away as you will miss.
Lock your exposure. Once you’ve dialed in the right exposure during your test shots, consider locking it so the camera doesn’t re-adjust when the lighting changes slightly (someone walks in front of a light, the spot operator adjusts brightness, etc.). On most cameras, you can lock exposure with a half-press of a dedicated button or by switching to full manual mode.
Use a fast zoom lens, not a prime. When you’re filming solo, you can’t swap lenses during the show. A 28-75mm f/2.8 or similar gives you flexibility — you can frame wider or tighter without touching the camera during the set. A prime lens gives you better low-light performance but zero flexibility if the framing isn’t perfect.
The Phone + Camera Combo
Here’s a dirt-cheap two-camera setup for solo filmmakers: use your real camera as Camera A (main shot, medium close-up with good audio) and prop your phone up as Camera B (wide shot, backup audio). The phone footage might not be amazing, but in editing, you can cut to the phone’s wide shot for a second or two between jokes and suddenly your clip has multiple angles.
For more on multi-camera approaches, see the multi-camera section of our camera guide.
Recording Your Own Set
This is the hardest scenario: you’re performing AND you need the recording to be good. Here’s what I do:
- Set up everything during the earlier part of the show while other comics are performing.
- Do your test shots and sound check before the audience arrives.
- Hit record on everything 5-10 minutes before you go up.
- Do your set. Don’t think about the camera. Perform for the audience, not the lens.
- After your set, check your camera to make sure it was actually recording (I’ve had the sinking feeling of walking off stage to a camera that stopped recording 10 minutes in).
If your set is early in the lineup, leave everything running for the rest of the show — you might catch someone else’s great moment too, and they’ll appreciate the footage.
During the Show: What to Watch For
If you’re not performing and you’re operating the camera during someone else’s set, here’s what to monitor.
Audio levels. Glance at your recorder’s meters periodically. If you see them hitting red (clipping) during big laughs, turn the gain down slightly. Clipped audio cannot be fixed in post.
Focus. If the performer moves significantly (walks to the edge of the stage, bends down to talk to the front row), check that autofocus is keeping up. Most modern cameras handle this well, but if you notice the focus hunting (going in and out), you might need to switch to a wider aperture or tap the screen to refocus.
Battery and card space. Know how much recording time you have. A 64GB SD card gives you roughly 2-3 hours of 4K footage depending on the codec. A fully charged camera battery typically lasts 60-90 minutes of continuous recording. If the show is long, have a plan for swapping batteries or cards between sets.
Obstructions. If someone sits down directly in front of your camera, you need to either ask them politely to move or adjust your tripod. Better to catch this early than to discover in post that half your footage has someone’s head in frame.
Everything That Will Go Wrong (And How to Fix It)
This is the section I wish someone had given me years ago. Every single one of these has happened to me personally. I’m giving you both the problem and the solution.
| What Goes Wrong | How to Fix or Prevent It |
|---|---|
| Sound person changes levels mid-set and your board feed audio is now ruined — clipping or way too quiet. | Always have backup audio: phone on stage, audience mic on camera, or Zoom recorder with both board feed AND built-in mics. Never rely on a single audio source. |
| Audience member stands in front of your camera and blocks the shot or messes up autofocus (camera focuses on their head instead of the stage). | Set up against a wall where nobody can stand in front of you. If using autofocus, set a focus zone/area that only covers the stage area so the camera ignores foreground objects. |
| Someone bumps your tripod and the camera angle shifts and now the comedian’s shoulder is out of frame. | Gaffer tape the tripod legs to the floor. Position against a wall or in a corner. Frame slightly wider than you need so a small bump doesn’t lose the subject entirely. |
| SD card fills up or camera stops recording mid-set. | Format your card before every shoot. Know your recording time limits. Use a camera with dual card slots if possible. Start a timer on your phone so you know when you’re approaching the limit. |
| Audio recorder dies — battery or memory card failure. | Fresh batteries every shoot. Use AC power adapter if near an outlet. Phone backup audio running simultaneously. |
| Performer walks out of frame during their best act-out and no camera caught it. | Frame wider than you think you need. Comedy performers move more than you expect. If possible, watch their set before filming to see how much stage they use. |
| Weird hissing or buzzing on audio from a loose cable, electrical interference, or a cell phone near the recorder. | Keep your recorder away from power cables and phones. Test audio with headphones before the show. If you hear a hum during sound check, move the recorder or try a different XLR output from the board. |
| Aperture is too wide and depth of field is so shallow that the performer drifts in and out of focus as they pace back and forth. | Stop down to f/2.8 or f/4 instead of shooting wide open at f/1.4 or f/1.8. You lose some low-light capability but gain a deeper focus zone. In a dark club, f/2.8 with ISO 3200-6400 is usually the sweet spot. |
| Battery dies at minute 45 because the opener ran long and your camera was recording the whole time. | Bring at least one spare battery. If your camera supports USB-C charging during recording, plug into a power bank. Know your battery life and plan accordingly. |
| ISO too high and the footage is grainy and unusable. | Modern cameras handle ISO 3200-6400 well. Above 12800, quality degrades noticeably. If you need to go higher, use a faster lens (f/1.8 or f/1.4 prime) to let in more light instead of cranking ISO. |
| Comedian’s face is blown out meaning the spotlight makes their face a bright white blob. | Switch to spot metering mode and meter for the face. Use exposure compensation -0.5 to -1.0. Shoot in a log profile if you want maximum highlight recovery in post. |
| Lighting changes mid-show and your fixed exposure is now wrong. | If you’re operating the camera, adjust exposure between sets or during a transition. If filming solo, slightly underexpose — it’s easier to brighten footage in post than to recover overexposed highlights. |
| Your performance was off — you messed up a word or a callback doesn’t land, and the clip doesn’t make sense. | This isn’t a technical issue but it’s real. Record multiple shows of the same material. The footage from your best night is the footage you use. Don’t try to make a bad-night recording work just because the technical quality was good. |
I keep this list because every single one of these has happened to me or someone I’ve filmed with. After you’ve been through each failure once, you naturally start preventing it. That’s the learning curve when I say those first 10 recordings are a wash.
Post-Production: From Raw Footage to Finished Clip
You survived the shoot. You have footage. Now what?
Step 1: Import and Organize
Copy all files from all devices to your computer. Create a folder structure:
Show Name - Date/Camera A/Camera B/Audio - Board Feed/Audio - Audience Mic/Phone Backup/
Before you do anything else, watch and listen to everything. Identify which takes are usable and which have problems. Don’t waste time editing footage that’s out of focus or has clipped audio. Many editing tools also let you review your footage at 2x speed just like YouTube.
Step 2: Sync Audio
If you recorded audio separately from video (board feed on a Zoom recorder, video on your camera), you need to sync them. Most editing software can do this automatically as DaVinci Resolve, Premiere, and Final Cut all have “sync by audio waveform” features. They match the camera’s built-in audio with the external recording and align them perfectly.
If auto-sync doesn’t work, look for a visual and audio cue — a clap, a tap on the microphone, or the start of a specific word — and manually align the waveforms.
Step 3: Multi-Cam Edit (If Using Two+ Cameras)
If you have multiple camera angles, create a multi-cam sequence in your editor. This lets you switch between angles in real-time while playing back the footage — like a live TV switcher. In DaVinci Resolve, this is called a “Multicam Clip.” In Premiere, it’s a “Multi-Camera Source Sequence.”
The general editing rhythm for stand-up comedy:
- Setup of the joke: Wide shot or medium shot. Let the audience see the comedian’s full body and the stage context.
- Punchline: Cut to the close-up right before or as the punchline lands. The facial expression and delivery are everything.
- Audience reaction: If you have an audience camera, cut to it briefly during big laughs. This makes the viewer feel like they’re in the room.
- Don’t over-cut. Let good runs play out on one angle. Cutting every 3 seconds is jarring and exhausting to watch. Cut for a reason (to emphasize something, to hide a problem, to show a reaction), not just because you can.
Step 4: Color Correction
Comedy clubs have terrible lighting for video. Your footage will probably need some color correction. At minimum:
- White balance: Make skin tones look natural. If the stage lights are warm and the background is cool, balance for the performer’s skin.
- Exposure: Brighten shadows slightly so you can see some audience detail. Pull down highlights if the face is too bright.
- Contrast: Add a touch of contrast to make the image pop.
If you shot in a log profile (S-Log3, C-Log), you MUST color grade the footage will look flat and gray until you do. DaVinci Resolve’s free version has excellent color grading tools. Apply a base LUT (look-up table) for your camera and then fine-tune from there.
If you shot in a standard color profile, you can often get away with minor adjustments and it’ll look good enough for social media. The good news is most social platforms let you filter good enough now anyways later.
Step 5: Crop for Vertical (If Needed)
If your final output is for Instagram Reels or TikTok, you need to convert your horizontal 16:9 footage to vertical 9:16. This is why shooting in 4K matters – you’re essentially cropping the center of the frame, and 4K gives you enough resolution to maintain full 1080p quality on the crop.
In your editor, create a new sequence at 1080 x 1920 (9:16). Drop in your 4K footage, then reposition and scale it so the comedian is centered in the vertical frame. You may need to keyframe the position slightly if the performer moves around a lot.
Some editors (including CapCut) have auto-reframe features that use AI to track the subject and automatically keep them centered in the vertical crop. It’s not perfect, but it saves a lot of manual work.
Step 6: Captions
Add captions to vertical clips. This is non-negotiable for social media in 2026. Most people watch Reels and TikToks with sound off while scrolling, and they’ll keep scrolling past your clip if there’s no text telling them what the joke is.
CapCut has the best auto-caption feature for free — it’s about 90% accurate. Spend 5 minutes correcting the errors and formatting. For YouTube videos, you can upload a caption file or use YouTube’s auto-generate and then edit it.
Step 7: Export
Export settings depend on where you’re posting:
| Platform | Resolution | Frame Rate | Format | Bitrate |
|---|---|---|---|---|
| YouTube | 3840×2160 (4K) or 1920×1080 | 24fps or 30fps | H.264 or H.265 | 35-45 Mbps (4K) or 15-20 Mbps (1080p) |
| Instagram Reels | 1080×1920 (vertical) | 30fps | H.264 | 10-15 Mbps |
| TikTok | 1080×1920 (vertical) | 30fps | H.264 | 10-15 Mbps |
For a deep dive on editing tools, see the editing section of our camera guide.
Your First Clip vs. Your Special: Different Workflows
Not every recording needs the same level of effort. Here’s what’s actually required at each level.
The 60-Second Social Media Clip
This is your bread and butter. One camera, one mic, edited in CapCut on your phone in 20 minutes.
Setup: One camera on a tripod, medium shot. External mic or phone audio near the stage. That’s it.
Edit: Find your best 30-90 seconds. Trim the beginning and end. Add captions. Crop to vertical. Post. The whole editing process should take less than 30 minutes. Don’t overthink it as consistency matters more than perfection. A decent clip every week beats a perfect clip every three months.
The 5-10 Minute YouTube Set
This is your showcase material. Two cameras (or one camera + phone), board feed audio, edited in DaVinci Resolve or Premiere.
Setup: Two angles (wide + close-up), board feed audio + audience mic. Color-correct the footage. Multi-cam edit between the two angles.
Edit: This will take 2-4 hours including color correction and audio mixing. Watch the full set, cut the weaker bits, tighten transitions. Export at 4K for YouTube. You’re building your portfolio with this content — take the time to make it look right.
The Full Comedy Special
This is the big one. Three+ cameras, professional audio, proper lighting, multiple filming nights.
Setup: Three cameras minimum (wide, close-up, audience/reaction). Board feed + multiple audience mics. If possible, hire a sound engineer for the night. Consider filming the same material over two or three nights and editing the best takes together — this is what Netflix specials do.
Edit: This is a 20-40+ hour editing project. Multi-cam editing, color grading, audio mixing, possibly motion graphics for titles. If you can afford to hire an editor who specializes in comedy, do it. If you can’t, DaVinci Resolve’s free version can handle everything — it’ll just take you longer to learn the workflow.
For camera recommendations at every budget tier, see our complete camera buying guide.
Release Strategy: Where and When to Post
You have a finished clip. Now what? Where you post it and how you present it matters almost as much as the footage itself.
YouTube
YouTube is where your longer content lives — 5-minute sets, 10-minute showcases, and full specials. It’s also where bookers and talent buyers go to evaluate comics.
Title: Don’t call it “John Smith — Stand-Up Comedy at Chuckles Bar.” Nobody’s searching for that. Use a curiosity-driven title based on the content of your strongest bit. “My Doctor Said I’m Too Healthy to Be This Angry” gets clicked. “John Smith Comedy Set” does not.
Thumbnail: A high-quality still from the performance with expressive face and minimal text. Bright, high-contrast, readable at thumbnail size. This is the single biggest factor in whether someone clicks.
Description: First two lines should hook the viewer (“In this set, I talk about [funny premise]”). Include timestamps if the video is longer than 5 minutes. Link to your Instagram, show schedule, and website.
Instagram Reels / TikTok
This is your discovery engine — where new audiences find you. Vertical, captioned, 30-90 seconds of your single best joke from the set.
Pick your best 60 seconds. Not the first 60 seconds. Not the “safest” 60 seconds. The funniest 60 seconds. The bit that gets the biggest reaction. That’s your clip.
Post consistently. One clip per week is better than five clips in one week and then nothing for a month. The algorithms reward consistency.
Captions are mandatory. Most people watch with sound off while scrolling. If there’s no text, they scroll past you.
When to Post
There’s no universally perfect time, but general patterns: Tuesday through Thursday, between 11am-1pm or 7pm-9pm in your audience’s timezone. Avoid Friday and Saturday nights (people are out, not scrolling). Avoid Monday mornings (people are catching up on work, not watching comedy clips).
More important than the perfect time: just be consistent. Pick a day and time and stick to it.
Conclusion
If you’ve read this far, you now have a complete workflow for filming stand-up comedy — from scouting the venue to posting the final clip. That puts you ahead of 99% of comedians who are still propping their phone on a bar stool and hoping for the best.
Here’s what I want you to remember:
Your first recordings will be bad. That’s normal. The goal isn’t perfection on night one — the goal is to get through those first 10 attempts where everything goes wrong so you can build the muscle memory and problem-solving instincts that make filming automatic.
Audio matters more than video. If you only invest in one thing beyond your camera, make it a decent audio setup. Clean audio with mediocre video will still get watched. Perfect video with terrible audio gets scrolled past.
Consistency beats perfection. One decent clip every week will grow your career faster than one perfect clip every six months. Record every set. Post the best moments. Keep going.
As Dwayne Perkins once told me: recording and watching your set between gigs is actually doubling your stage time, since you were probably going to do the same things again without any adjustment. The camera is a tool for getting better, not just for getting famous.
The internet continues to democratize stand-up comedy. Comics like Mark Normand, Shane Gillis, and many others are recording and releasing their own specials and surpassing the viewership of major network shows — with gear you can buy on Amazon for under $2,000.
What’s stopping you?
For specific gear recommendations at every budget level, read our complete camera buying guide for stand-up comedy. For tips on building your comedy career beyond just filming, check out our guide on how to grow your stand-up comedy career.
Frequently Asked Questions
Do I need permission to film at a comedy club?
Yes. Always ask the venue owner or manager before you set up any recording equipment. Some clubs have strict no-filming policies, others have their own in-house recording setup, and others are perfectly fine with it. Getting permission also means the staff won’t hassle you during the show, and you can often get help with things like accessing the soundboard or finding a good spot for your tripod.
Can I film my set on just a phone?
For reviewing your performance at home, absolutely you should be recording every single set, even if it’s just a phone propped on a stool. For posting to social media, a phone can work for short clips if the venue has decent lighting and you’re close to the stage. But for anything you’re serious about (EPK material, YouTube sets, specials), a dedicated camera with a real lens and external audio will produce noticeably better results. See our phone vs. camera comparison for the full breakdown.
Nothing breaks my heart more than seeing hilarious seasoned comics upload their excellent bit in a blurry, distant phone recording only to get 7 comments and slowly fade away.
What’s the absolute minimum setup for a usable clip?
One camera (or phone) on a tripod, plus one external audio source (even just a second phone placed near the stage). Total cost if you already have a phone: $0-$30 for a phone tripod mount. The audio from the second phone, synced to the video in editing, will be dramatically better than the camera’s built-in mic picking up the whole room.
How do I sync separate audio and video in editing?
Most editing software has automatic audio sync — it matches the waveforms from your camera’s built-in mic with the waveform from your external recorder and aligns them. In DaVinci Resolve, right-click your clips and select “Auto Sync Audio.” In Premiere, select both clips and choose “Synchronize.” If auto-sync fails, manually find a visual and audio cue (like a clap or a specific word) and drag the audio clip until they align.
Should I film every set or just the ones I think will be good?
Film every set. You never know which night the audience will be perfect and your material will hit just right. Some of my best clips came from nights I almost didn’t bother recording. The cost of recording is basically zero (SD card space and battery), but the cost of missing your best set is immeasurable.
How long does editing a comedy clip actually take?
A 60-second Instagram clip with captions: 15-30 minutes in CapCut. A 5-10 minute two-camera YouTube set with color correction and audio mixing: 2-4 hours in DaVinci Resolve. A full hour-long special with multi-cam editing, color grading, and sound mixing: 20-40+ hours. The first few times will take longer as you learn the software, but it gets much faster with practice.
Is it better to record the same set multiple nights and combine the best takes?
For a special or important YouTube release, absolutely. This is standard practice in the industry — Netflix specials are often filmed over two or three nights, and the editor picks the best audience reactions and tightest performances from each night. For weekly social media clips, one night is fine. But if you’re recording something that represents your best work, give yourself multiple chances to nail it.
What’s the biggest mistake new comedians make when filming?
Neglecting audio. They spend $2,000 on a camera and lens and then use the camera’s built-in microphone, which sounds like the comedian is performing in a sewer. A $200 audio recorder with a board feed will do more for the quality of your final clip than upgrading from a $1,400 camera to a $3,500 camera. Get the audio right first. Everything else is secondary.
This post was originally published on ComedyMemphis.com and has been completely rewritten for 2026 with updated workflows, current gear references, and expanded troubleshooting. If you found this helpful, share it with a comic in your scene who’s still filming on their phone. For specific camera, lens, and audio gear recommendations, check out our complete camera buying guide. And for more guides on growing your career, visit our blog.